Sunday, December 16, 2012

Cake Batter Cut Out Cookies

These are going to be my new go to cookies when I want to use a cookie cutter. I love making sugar cookies at Christmas, you know for Santa haha. But I like my cookies soft and that seems to be a hard thing to get in sugar cookies but not these, they stay soft!!! One thing I have also decided is why stay with white cake mix? I might have to try another flavor too. Here is the simple recipe I found on Pinterest from  Goodness Gracious.


In her recipe she uses Funfetti cake mix but me I had lots of Christmas colored sprinkles around the house that I needed to use up, so I just got white Cake mix and added my own colors. I think this will be great if you are having a party with specific colors.


WHAT YOU NEED

1 box cake mix
2 eggs
1 stick softened butter
1 teaspoon Vanilla

What to do
1. Mix everything together (easy right?)
2. refrigerate from 1 hr then FREEZE for 1 hr
3. Flour your surface where you will roll out VERY WELL. You will also be adding flour ontop of your dough as you roll out because I found this is a very sticky dough.
4. Decorate if you wish (you can of course frost after baking just like any sugar cookie)
5. Bake at 350 12-15 min. Cool on cooling rack.

Here are some pictures of my process.

Step1
 
                         
No pictures for step 2  I don't think you need a picture of my bowl in the fridge and freezer :)
 step 3- 5

Enjoy these sweet and SOFT cut out cookies!!!!


Pin It

Wednesday, October 17, 2012

Disney Trip Count Down!!


This past weekend my sister took a break from her own busy life as a working mom and wife to come down and help my husband and I get something things together for our baby arriving this December. So of course I had to show off my Silhouette machine! Her and my Brother-in-law are taking my nephew to Disney land just after Thanksgiving this year, and he is so excited! Well my sister is a pinterest lover and we found this one by Mama Of All Trades and decided Connor needed one! So this is a tutorial about ours!


What you need

-A 9 inch circle cut from card stock backed by a 9 inch piece of chip board to make sturdy (black and white paper)
- An inner scalloped circle measuring (red and white paper)
- A Mickey of course!
-30 clothes pin
-15 red scalloped circles
-15 blue scalloped circles
-30 yellow circles with numbers 1-30 on them measuring to fit inside the red and blue scalloped circles
-A glue gun, runner, stick
-Ribbon for hanging.


 Glue the two 9 inch circles together and then its a simple layering game. Glue on the large scalloped circle and then Mickey with a glue runner and glue stick

Glue even numbers to the small blue scallops and the odd numbers to the red small scallops. After they are glued together hot glue on to the clothes pins. 


Now you are ready to put the numbers around the circle and add your ribbon for hanging!! For our ribbon I did add an eyelet to the top but if you are using a much thicker ribbon you could probably hot glue it on since that ribbon would be stronger than the one we used. The great thing is all we had to buy for this was the clothes pin and you can totally change this up for a holiday count down or a trip to somewhere else. Hey a picture of grandparents and the kids would be cute in the center if you are getting ready to go visit them!


Pin It

Monday, October 1, 2012

Owl Cup cakes and Halloween party time!!

Happy Halloween!!! 

Well almost at least. Here you are going to find a super cute and easy cupcake along with other links to get your home ready for this spooky holiday. So if you are having a party this year or just want some fun around your house we have some great ideas for you!


Owl Cupcakes 
Lets start with some cute and super easy cupcakes!! These can be done as mini ones like I did or regular, if you choose regular sized just make sure you buy the ingredients in regular size not mini.

What you need:
-Chocolate  Mini cupcakes- use whatever your favorite recipe is (even if it comes in a box)
-Chocolate frosting
-Mini Oreos
-Mini M&M's

Frost your cupcakes lightly. Then start opening up our oreos. The side with cream will be used as the eyes and the side with out you cut in half and use for the ears.


With the mini M&M's you really just need the brown and yellow ones. The yellow ones put on sideways as a nose (see above) and the brown ones put a drop of frosting on and put onto the eyes.

Add the half oreo sides above the eyes(like above). At this point you can be finished or if you want pipe small lines of frosting on the ears to cover the cookies and look like fur and maybe add a little bit of spiked hair around.


I think this are just too cute!!!! I really wish I had gotten big Oreos and M&M's so they could have mommies.

Here are some more fun Halloween ideas for this season

More from my blog:
Halloween Wreath

Pumpkin Frozen yogurt 

Mummy Cupcakes


From my Best Friend Veronica over at Cookingmorningnoonight

Boo Sign

Wrag Wreath


Eye ball Wreath

Monster Munch!
Pin It

Saturday, September 29, 2012

Halloween wreath


So I really had every intention of doing this blog late last week or over the weekend but things got a little crazy (more on that later). Its officially fall and just about time to start decorating the yard for Halloween so here is a very cute simple wreath for your door! Oh and the best part...its interchangeable!!!

So usually my husband And I go all out for Halloween but that was when we were in Illinois with a big front yard so this year I have my little door area at our apartment. And all over pinterest are wreaths of every kind! But I really liked this tutorial at Craftaholics Anonymous.

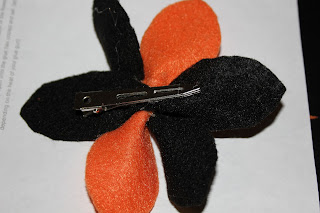
I changed a couple things for my wreath! I made my flowers from felt because I didn't like the colored burlap at my fabric store.

What you need!
-Wreath form (mine was 14inches)
- 1/3 yard of burlap cut into 2.5 inch strips
-Scraps of colored burlap or I used 2 page sized sheets of felt
-Hot glue gun and glue
-Coordinating buttons
-Alligator clips


Once you have a nice pile of bulap like this....


Take a strip and hot glue the end to your wreath form and start wrapping like this...

 One at the end of a strand glue it in place and continue with another until covered.
 Chai enjoyed helping me with this project!
The next step is to design your flowers. I just made mine up as I went along. But feel free to follow the steps on the original blog. 


After you make your cute little flowers glue a clip onto the back. Make sure not to glue the clip closed!

Now you can make the rings from extra burlap if you want. I didn't, I just slipped my clips in the over laps. But when I decided to add the little pumpkin you see I did have to add a strap for that to get it to sit right. 


I can't wait to take the accents off and come up with another design for the same form!!!

Pin It

Wednesday, September 12, 2012

Pumpkin Frozen Yogurt

I wouldn't be surprised if you saw this on pinterest or even another blog, it has been floating around an awful lot. Its a very simple 4 ingredient frozen yogurt at home! So when I pinned this recipe it came from here http://blogs.babble.com/family-kitchen/2011/10/22/skinny-halloween-treat-4-ingredient-homemade-pumpkin-frozen-yogurt/ .

This was so quick I made it during my husbands lunch break. I think he enjoyed getting a little treat before heading back to work.


What you need
1 cup vanilla yogurt, strained (my husband was nice enough to point out this is what greek yogurt is and I    
            could have just bought that)
1 cup pumpkin puree
1 tablespoon sugar
1 teaspoon pumpkin pie spice.


There ya go all you need my guess is you probably have 3 out of 4 already at home!


Mix those together and put into your ice cream machine until its your desired texture.


Like my little paper pumpkin?? It took longer to put together then the ice cream did. If you have a silhouette  machine I really suggest making it!


Oh and for a fun add on I wanted to give a little update on the cats part of this blog. They are chubby and sleep lots. Meaning they are doing just what a house cat should


Pin It

Thursday, September 6, 2012

Clam Chowder


So here's the thing, kids are back in school and pumpkin greatness is back at Starbucks there for I say fall is here!! And even though I have no idea what the weather will be like here in San Diego for the next two seasons (for sure not what we are used to) that is not going to stop me from making those warm comfort foods that are enjoyed as the leaves turn colors and the kids bundle up in those cute costumes.

So my first comfort food soup! And this was not just any soup I made clam chowder in sourdough bowls!! But don't get too excited I didn't make the bowls. I did however take things from a couple recipes to come up with a simple yet yummy soup that lasted us one dinner and two lunches.

Clam Chowder
3 slices peppered bacon
2 cups chopped onion
1/2 teaspoon dried thyme
2 garlic cloves, minced
4 large potatoes cubed
2 (5oz) cans clams, juice reserved
2 cans cream of celery soup
1 cup heavy cream
1 cup milk
1 tablespoon butter

*Add bacon to large pot and cook till crispy.
*Add the onion and garlic until the onion is translucent.
*Add reserved clam juice and potatoes. Cook until potatoes are fork tender (15-20 min). Stirring occasionally.
*Add remaining ingredients and cook for another 30-45 min or until thickened. Don't forget to stir occasionally to keep from sticking!!

For the bowls check out the fresh bread section in the grocery store and find small sourdough rounds
 Use a paring knife to cut the top much like you would a pumpkin
 Use a spoon to help hollow out the bowl some more. Don't throw away any of the bread!! Use it for dipping in the warm goodness!
 Fill with the soup and enjoy! And when I say enjoy I mean don't forget to eat the bowl too.

Pin It